Friday, 30 December 2011

Christmas Make: Handmade pressies

This year saw me and Mr PC giving mostly handmade gifts for Christmas, which although as times was a bit stressful trying to get them all finished in time, it was great and so worth the positive feedback we've had!

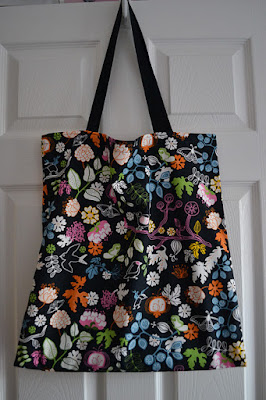
These are some shopping bags I sewed up which I couldn't post about til after Santa made his deliveries:

Doggie print bag for a doggie lover

Cute or what?!


Bright and colourful bag perfect for winter time!
My favourite detail in the pattern

Did you make any gifts for Christmas?

Thursday, 29 December 2011

Floral footstool

A while a go I attened an upholstery workshop and make this delightful cupcake footstool which I love. I love mine so much that I thought I would make one for each of Mr PC's nans for their Christmas presents. I only managed to get pics of one of the footstools before Santa took them away for delivery but I thought I'd share the pics, particularly as I finally found a use for that vintage feel rose print!


Wednesday, 28 December 2011

Christmas Prep: Christmas Cake Eaten!

Hope you all had a splendid Christmas with lots of great food and drink and merriment with friends and family. I thought I'd share a few pics of the finished Christmas cakes as I mentioned before here and here.


And for those of you into 'food porn', here's a pic of the inside. Can you smell the brandy and taste the fruit? I can!!


These are the images that inspired our designs, and I think Mr PC did a great job of laying the decorations on both the cakes!

via pinterest

via pinterest

Wednesday, 21 December 2011

Christmas Prep: Christmas Cake in Progress

Christmas is not Christmas without a decent Christmas cake. All the better if it is home baked, but I have had some nice shop bought ones too. The other night I covered the cakes in marzipan ready for the fondant icing. And, as there were trimmings, we ate them whilst watching the telly! I was going to use the spare marzipan to make something but...


Over the next day or two I'll be decorating these lovelies and then they will be ready for the Christmas festivities!

Friday, 16 December 2011

Christmas Tree, Oh Christmas Tree...

... How lovely are thy branches!

I thought I would round up this Christmassy themed week with my piece de resistance - the Christmas tree!

I am the first to admit that I'm rather anal particular about the way my Christmas tree should look. It all starts with selecting the tree at the tree farm. It must be a minimum of 6 foot, the taller the better really but there must be room for the star on the top. It must be bushy and full from top to bottom with lots of branches. We have a tree stand that takes water which helps the tree last longer and you'd be surprised how much water it soaks up! Watering the tree daily is an absolute must, particularly if you put it up early.

Ready for dressing

The lights go on first and I always ensure to have the wire under the branches with the lights on the top, so they look as if there by magic. Then the tinsel goes on towards the middle of the tree so that it doesn't overtake the decorations themselves. This year I decided not to use tinsel at all and just use the red and gold beads. I'm trying something new and I think I like it without the tinsel! Mr PC, however is most displeased with me putting my foot down on the tinsel front. You can't please everyone...

Decorations at the ready!
I always unpack all the decorations and lay them on to trays according to their size before I start. I put the largest decorations on first and space them out across the tree. The 'special' decorations get pride of place so they can be shown off to their best. Then the smaller decorations go on and then the chocolate ones and candy canes go on last as these are the ones that come off the tree first!


The star goes on the top and the tree skirt gets laid around the bottom once it's all finished.


When decorating the tree last week I joked to Mr PC that I should write a book and call it 'The Only Way to Decorate a Christmas Tree'. He told me he didn't think it would sell very many copies. I can't think why...

Thursday, 15 December 2011

Christmas Make: Christmassy Bunting

There has been a huge trend in bunting in the last year or so. Everyone's jumping on the 'vintage bunting' bandwagon. Last year I thought it would be cute to make some Christmas bunting and thought it looked nice but wasn't enthralled by it. The process of making it was too fresh in my mind and looking at it just reminded me of the blood, sweat and temper tantrums I had with the sewing machine while trying to sew it together.

This year, however, I've unpacked it and decided that I do really like it after all and am really rather pleased with it!

Cute snowman print

Holly pattern


Bunting is for all occasions, not just summer garden parties!

Wednesday, 14 December 2011

Christmas Make: Candycane Tree Decoration - Tutorial

Last year I posted a tutorial for a quick and easy tree decoration using candy canes, one of my favourite additions to the Christmas tree.


This year I have made them again and so I thought I would repost the tutorial for those who missed it the first time around. Click here to see how you can make this splendidly festive decoration in a matter of minutes.

PS. You can read all of my Christmas themed posts here. Enjoy!

Tuesday, 13 December 2011

Christmas Make: Window Decor

This year I'm going all out on the Christmas decorations. I've spent a lot of time on Pinterest (my preferred method of procrastination) and have pinched incorporated a number of ideas into my decorating and preparations this year. 

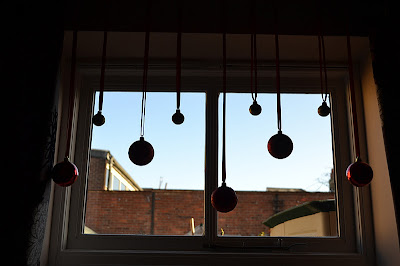
Today I'm sharing a fabulously cheap and easy way to spruce up your windows for the festive season. It was rather difficult to photograph well but hopefully you can see what I did.

Red and gold glittery baubles

For this window, I used a length of wire and wound it around the curatin pole brackets so that I can still close the curtains without spoiling the decoration. Then I used some ribbon threaded through the baubles and tied around the wire.


These look really great, particularly in the daylight and they look great from the outside looking in too.  

Monday, 12 December 2011

Pom pom garland

Regular readers will be familiar with one of my newest obsessions - my pom pom maker! I made the pom pom wreath, and I also made some lovely pink and purple pom poms but they were pushed aside while I finished the wreath. They were destined to be made into a garland and now they're all strung together I wanted to show how great they can be as an alternative to bunting.


New memo boards in stock

Last week was a very busy week on several levels. I had a two day event over the weekend at Marks Hall and on Sunday night I flew to Edinburgh to spend the week at home with my Grandad. I had to work at double speed to get two weeks' worth or work, crafting and Christmas prep done before I left. This week will be a welcome rest! So here I am in my hometown of Falkirk writing away and feeling rather pleased with myself for having set up a working wifi network to connect my phone and laptop to the interwebs - a great technical revelation for this 4 storey split level house!!

I made 8 memo boards last week so thought I'd share some pics for you. All are 16x20inches and priced at £20 so if you fancy one for a Christmas gift, give me a shout! These will make it to my Etsy shop but not sure when yet.

 
Manly fishing boats pattern - very bright and cheery colours

I finally found a use for that Ikea fabric I love so much!

My favourite part of this kooky print

A bespoke order for a wee boy's bedroom

Dinosaurs are cool!

A bespoke order for a shoes and handbag lover


Bespoke order, this one is out of this world!

Vintage style rose print

Friday, 9 December 2011

Christmas Market Tomorrow

This weekend is the Marks Hall Christmas Market and not only am I excited about the whole Christmassy feel of it, but it also marks the 1st anniversary of my first ever stall at a market! I'll be there again this weekend and really looking forward to helping people with the Christmas shopping :)

However, I am certainly not looking forward to spending two days standing in a marquee with no heating. On the plus side, at least there's no snow this year. Last year it was truly baltic. Here's hoping this weekend is not too cold.

If you're needing a helping hand to get into the Christmas spirit, I definitely recommend the Marks Hall Christmas Market to get you in the mood for the upcoming festive season. Come say hi if you do come along!

Thursday, 8 December 2011

Christmas Make: Door Decor

We always have a real Christmas tree, and I am very particular about how the tree should look. I always trim a few branches off to make the tree perfect (there are always a few pokey out branches, aren't there?) and I also trim a few at the back so it can go closer to the wall. I'm not talking masses of pruning, but just a few snips here and there.

This year I had a few large pieces and I couldn't bear to bin them. I already have my table centre sorted so I wondered what I could do with the trimmings. Then I had a light bulb moment and thought of making a festive decoration to hang over a door. These cost a fortune in the shops, especially for real tree cuttings but seeing as I already had everything I needed, it was totally free to make!


I wired the cuttings together using florist wire (any thin wire wold work) and then used some spare red and gold baubles and a matching ribbon to finish it off. The possibilities are endless and you could make it to coordinate your Christmas colours. Why not try making one yourself, and have a totally unique alternative to a wreath?

Wednesday, 7 December 2011

Christmas Make: Pom Pom Wreath - Tutorial

In my last post I mentioned how much in love I am with my Clover pom pom maker and that I had an idea for a wreath. Well, it's finished now and I must say I am so pleased with it, I can't tell you how much!!


I saw something similar to this on Etsy and realised that it would be the perfect use of my pom pom maker which up until then was producing pom poms with no real purpose.


I used  a length of pipe insulation (the grey stuff around the pipes in the loft) and Mr PC taped it into a circle for me. It was quite narrow so I decided to wrap some wadding around it to pad it out a bit. Then I used some fabric to cover it over so it was pretty on the back as well as the front.


I attached the ribbon first so that it was under the pom poms. Then I got glue happy and started sticking all my lovely green, red and white pom poms on! I used a hot glue gun to attach everything to the wreath but you could sew it if you prefer. For me, the glue was faster, and more fun too!


And there we have it, a modern take on the Christmas wreath! It is currently adorning the inside of my front door and it looks delightful, even if I do say so myself! And the best part is, it hardly cost a thing because I already had everything I needed and the wool was just £1.79 per ball and I estimate I used about two balls of each colour, so all in all it cost just over a tenner which is a total bargain :)

You could certainly make the pom poms in different colours for different holidays and events. And the wreaths could be all kinds of shapes, I think heart shaped would be nice for a wedding.
Related Posts Plugin for WordPress, Blogger...